
ONE ROOM CHALLENGE, WEEK 2 | DIY Zero-Waste Raised Garden Beds
- May 13, 2020
- 5 min read
Updated: Jan 6, 2022

Growing a garden is a very personal pleasure.
As we tick off Week 2 of the #OneRoomChallenge, I'm blissful that our raised garden beds made from salvaged wood are completed, if not completely by the book.
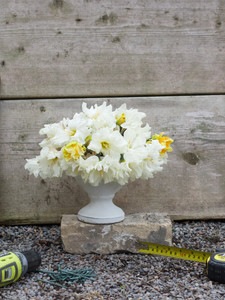
Make no mistake, this is all about the flowers. The raised beds we're making are intended to be a cosmetic perimeter. Like eyeliner, they're built with the purpose of showing off the pretty stuff growing inside each box of wooden planks. Of course, raised beds offer much more than window dressing. They can improve drainage, prevent erosion, facilitate maintenance, mitigate poor terrain, extend the growing season - all good things gardeners need.
But, what I want mostly, are flowers.


In its seventeenth season, the One Room Challenge™, takes place in April and October. Each round, twenty design influencers take the challenge as Featured Designers. Every Wednesday, the designers document their process over six weekly posts (bumped to eight weeks this season due to the pandemic). Better Homes and Gardens is the official media sponsor.
In addition to following along, everyone with a blog or Instagram account, is welcome to join the fun as a Guest Participant by linking their own room transformations up each Thursday, flooding the internet and social media with interior design inspiration, ideas, and encouragement.
This is our first One Room Challenge and the first project in our new house. Follow along as we transform our forgotten garden into a blooming flower studio and botanical backyard. We are #LovingLeuty.
Goldilocks Garden Beds - Just Right For Us
I've lusted for raised garden beds for some time. I've done my research. Read up on the pros and cons. The best practices. How big to make them. What to construct them out of. What to fill them with.
We know what we're suppose to do. Despite this, we've customized our beds to suit us and broken a few rules along the way. It wouldn't be the first time when it comes to design, I please myself.
As should you.


SIZE
Most green thumbs agree that raised beds are ideally three-to-four feet wide and six-to-eight feet long. That's so you can reach across the bed without tromping on, and therefore compacting, the soil.
Oops. Each of our four, giant-sized raised beds is a whopping seven feet wide by twenty feet long. We see them more as a border that will frame the subject matter and stars of our living art composition - the flowers.

Ready for planting. Our oversized raised rectangles are twenty feet long by seven feet wide.
MATERIAL
There's a lot of debate about what wood to use in the construction of garden beds due to the concern over potential chemical leaching. Untreated lumber like natural cedar is the gold standard particularly if you are growing food or going organic. My research tells me pressure-treated wood can be OK if dated after 2003 when the sale of lumber treated with chromated copper arsenate (CCA) for residential use was banned. My first choice would have been to use untreated wood, but we had stacks of newish, treated wood from the deck we took down, as well as some leftover untreated wood from an old outdoor hockey rink. These boards would go in the landfill if not reused. Since we are mostly growing florals for arranging and not consuming, we decided to repurpose the wood we had on hand.

Salvaged wood and screws from our property make the raised beds zero-waste.
SOIL
Preparing a rich growing soil is like making a fine wine. It takes patience and practice. We filled our beds with a beautiful triple mix of one-third topsoil, one-third peat moss and loam and one-third manure. Each year we will continue to augment the soil with compost and other nutrient-rich matter. Some might say we need to add more grit (something like sand) to help with drainage but our beds aren't that high so we'll see how it goes.
Often raised beds are a solution to grow on top of existing grass. You put down a barrier like cardboard directly on the grass to stop its growth, then fill the bed with about twelve inches of soil. In our case, we stripped out all the grass and filled our beds with about six inches of our triple mix. We're hoping the roots will find their way down below the former grass line and rock it out.

The best soil we've ever had - a gorgeous mix of top soil, loam/peat moss and compost.
SUN
Oh to have eight hours of direct light. Placing your raised beds in an area that gets as much sunlight as possible is optimal for growing cut flowers. No such luck for us. With a number of large trees near our back yard, light will be one of our biggest growing challenges.
Not to be deterred, we have done the best we can with pruning back sun-sucking tree branches to let the light in. We've also modified our plant mapping and plant varieties - more on that in a later post where I'll share what will thrive in a semi-shade garden (we hope).

British gardening guru Monty Don says you should know how the sun falls on your garden at every hour.
How To Build Zero-Waste Garden Beds
It's really easy to build these beds - especially since my in-house landscaping crew did all the work. Graham led the construction with our children, Ben, Ruby and Theo as mostly compliant helpers.
As with most things, it's the planning and prep that takes most of the time. Once we figured out the placement and size of the beds and how to put them together, it took two afternoons for construction, two afternoons for installation and one day to fill the beds (lugging four cubic yards or 8,000 pounds of soil dumped in our driveway to the backyard).
to make each twenty-foot long by seven-foot wide bed
Construct a rectangular shape by attaching two, twenty-foot boards (made by attaching two smaller size boards together, because who has a twenty-foot board?) to two seven-foot boards
Use a block of fence post as the anchor to screw in the boards at each of the four internal corners
We made these blocks a bit longer than the bottom of the bed forms so we could dig them into the earth to act as an anchor
a few notes
We reused old hockey rink boards, deck boards, fence posts and deck screws
Because nothing is totally a breeze, we had to even the level of the boards as the two types of boards we used were different heights (the rink boards are ten inches high and the deck boards are eight inches high)
We did this by digging a trench in the soil to adjust for the variation in board heights as well as the uneven topography of the back yard
We used landscaping fabric to cover the beds and keep them dark during the course of construction to prevent the grass from growing back

We completed one bed first as a test to make sure our plans would work. Lucky for us it did.

An old fence post is cut to anchor each of the four internal corners of the raised beds.

The happy (mostly) work crew. From back to front: Graham, Ruby, Ben and Theo.

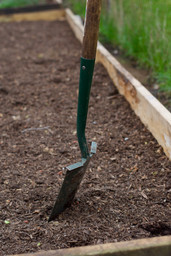
It's all for the blooms.
Up Next
In Week 3 we use our secret weapon to transform the garden shed and from drab to fab.
Need More Inspiration?
If you missed it, please check out the starting point for this botanical backyard do-over, Week 1.
And be sure to visit One Room Challenge and Better Homes and Gardens to follow along with hundreds of other inspiring home-loving kings and queens working their magic during the #OneRoomChallenge.


Thank you so much for this amazing website. It's full of interesting and useful information. I've gathered a lot of valuable information. A popular game that a lot of people like to play is: tiny fishing
The experience is a subtle exploration of momentum and the gravity of small burdens. Navigating the world of eggy car game is a delicate lesson in gentle persistence.
I can't wait to see all the beautiful flowers you grow in these flower beds
Beautiful Cynthia. I can't wait to see this progress.